This website or its third-party tools use cookies which are necessary to its functioning and required to improve your experience. By clicking the consent button, you agree to allow the site to use, collect and/or store cookies.
This site requires cookies to work. Please click the consent button to view this website.
I accept
Deny cookies Go Back

Focus Photo School

  • Member Login
  • Course Library
    • ADOBE LIGHTROOM CLASSIC TUTORIALS
    • ADOBE LIGHTROOM FOR MOBILE APP TUTORIALS
    • ADOBE LIGHTROOM (CLOUD-BASED) TUTORIALS
    • ADOBE PHOTOSHOP TUTORIALS
    • PHOTOGRAPHY TUTORIALS
    • SNAPSEED FROM GOOGLE APP TUTORIALS
  • Join Now

How To Use Point Color In Lightroom Classic

    Divider LineAdobe Lightroom Classic continues to improve its photo editing capabilities with the latest innovation – the Point Color feature. This incredible new tool makes targeting precise adjustments to individual colors fast and easy.

Click here to download the examples in this video and play along! (Subscribers Only)

Divider Line

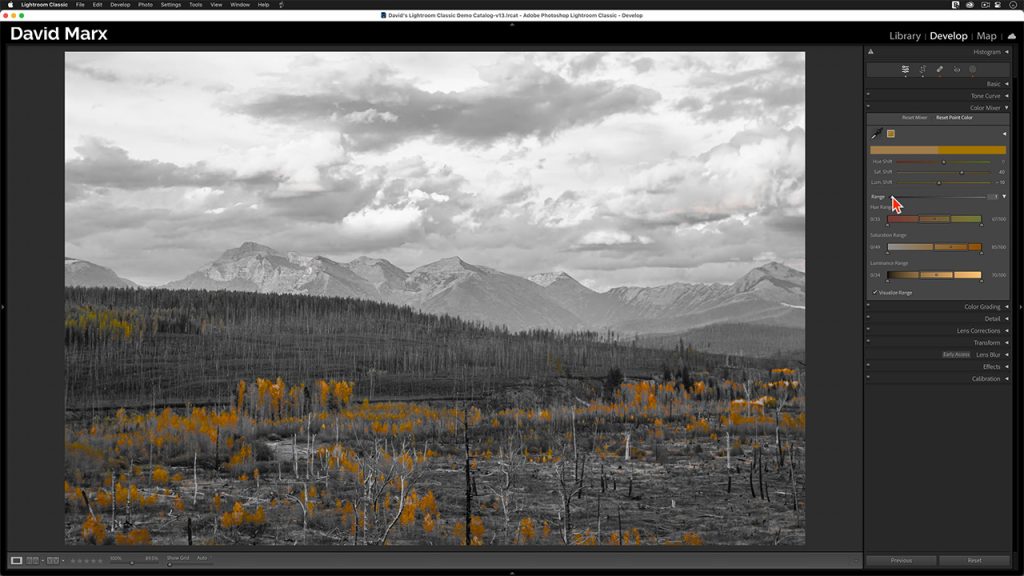
The Point Color panel allows us to fine tune the Hue, Saturation, and Luminance of individual colors throughout our images. Unlike Classic’s older HSL Color Adjustment Tools, Point Color is a game-changer for those who need pinpoint control over the colors in their photographs.

The older HSL color adjustment toolset relies on predefined color ranges. When you change the saturation value for the Reds, for example using the HSL tools, a broad range of red tones are adjusted and there is nothing that you can do to redefine exactly which shades of red will be affected.

This is where new Point Color tools differ from anything that we have ever seen before. With Point Color, there are no predefined color ranges and you get to tell Classic exactly which shades that are similar to your targeted color it should include in this adjustment.

Getting Started with Point Color

To access the Point Color feature, scroll down to the newly renamed Color Mixer panel inside of Classic’s Develop Module. Once Point Color is active, use the new Color Sampler Tool to select the color(s) that you want to adjust. Lightroom will create a new “Color Swatch” for each point that you sample and then it will give you precision color adjustment controls for each swatch.

Fine-Tune Your Color Adjustments

Working with Point Color, you can use any combination that you want of the Hue Shift, the Saturation Shift, or the Luminance Shift commands to make precise alterations. You can also use the Range slider to include, or to exclude, similar hues from your color adjustments. Lowering the Range slider is often all that it takes to eliminate the changes that you have made from spilling over into other similar colors.

When needed, you can also use the new Hue, Saturation, and Luminance Range sliders for even more surgical precision. These powerful new controls allow us to isolate the exact color that we want to change in three dimensions.

Point Color Range In Adobe Lightroom Classic Screenshot

Combine Point Color with Masking

One of the standout features of Point Color is its compatibility with Classic’s Masking capabilities. Using a Mask plus the new Point Color feature, you can improve the skin tones in a portrait, for example, while leaving the background untouched.

Pro Tips for Effective Point Color Usage

Here are some additional tips to help you master Point Color:

  • Visualize Range Checkbox: Use the Visualize Range checkbox to preview which parts of your image will be affected by your color adjustments. This helps you narrow down your selection and to avoid unwanted changes to similar colors.
  • Alt / Option Key: When adjusting any of the sliders inside of the Point Color Panel, hold down the Alt key on a PC or the Alt / Option key on a Mac to see exactly which parts of your image are being affected. This secret feature is a huge help since it provides real-time feedback as you tweak your adjustments.

Point Color in Lightroom Classic offers unprecedented control over color correction, making it easier than ever to enhance specific colors and achieve the perfect look for your final image!

Unlock Focusphotoschool Course Banner

View Next
  • LIGHTROOM CLASSIC: BASIC IMAGE EDITING
    • Module 1:IMAGE EDITING BASICS
      • Lesson 1:Editing Without Fear In Adobe Lightroom Classic
      • Lesson 2:5 Useful Develop Module Keyboard Shortcuts In Adobe Lightroom Classic
    • Module 2:OPTICS
      • Lesson 1:How To Use The Lens Correction Panel In Adobe Lightroom Classic
      • Unlock This Lesson
        How To Use The Transform Panel In Adobe Lightroom Classic
    • Module 3:PROFILES
      • Lesson 1:Profiles In Adobe Lightroom Classic
      • Lesson 2:Unlocking Adaptive Profiles in Adobe Lightroom Classic: AI-Powered Precision
      • Unlock This Lesson
        How To Set New Raw Develop Defaults In Adobe Lightroom Classic
    • Module 4:EXPOSURE IMPROVEMENTS
      • Lesson 1:How To Set The Exposure In Adobe Lightroom Classic (Basic)
      • Lesson 2:How To Set The Exposure In Adobe Lightroom Classic (Advanced)
      • Unlock This Lesson
        How To Use Auto Exposure In Adobe Photoshop Lightroom Classic
      • Unlock This Lesson
        Adding A Vignette In Adobe Photoshop Lightroom Classic
      • Unlock This Lesson
        Adding Contrast With The Tone Curve In Adobe Photoshop Lightroom Classic
    • Module 5:COLOR ADJUSTMENTS
      • Lesson 1:White Balance Corrections In Adobe Photoshop Lightroom
      • Lesson 2:How To Use Saturation & Vibrance In Adobe Photoshop Lightroom Classic
      • Unlock This Lesson
        How To Use The Target Adjustment Tool In Adobe Photoshop Lightroom Classic
      • Lesson 3:How To Use Point Color In Lightroom Classic
      • Lesson 4:How To Use Color Variance In Lightroom Classic
      • Unlock This Lesson
        Boost Your Colors With The Calibration Panel In Adobe Photoshop Lightroom Classic
      • Unlock This Lesson
        How To Use Color Grading In Adobe Photoshop Lightroom Classic
      • Unlock This Lesson
        The Amount Slider Hack You’ve Been Missing In Lightroom Classic
    • Module 6:BLACK & WHITE CONVERSION
      • Lesson 1:How To Make Black & White Photos Using Adobe Photoshop Lightroom Classic
      • Unlock This Lesson
        How To Add Grain With Masks In Adobe Photoshop Lightroom Classic
    • Module 7:DETAILS
      • Lesson 1:AI Denoise, Super Resolution & Raw Details Workflow Updates
      • Unlock This Lesson
        How To Use Lens Blur In Adobe Lightroom Classic
      • Unlock This Lesson
        Manual Noise Reduction With Adobe Photoshop Lightroom Classic
      • Unlock This Lesson
        How To Sharpen In Adobe Photoshop Lightroom Classic
    • Module 8:IMAGE REPAIRS
      • Lesson 1:AI Dust Spot Removal In Lightroom Classic
      • Lesson 2:The Generative Remove Tool In Lightroom Classic
      • Unlock This Lesson
        How To Use The Content Aware Remove Tool In Lightroom Classic
      • Lesson 3:How To Remove Reflections Using AI In Adobe Lightroom Classic
      • Unlock This Lesson
        Red Eye Removal In Adobe Photoshop Lightroom Classic

Your Account

Your Member Profile & Billing Info

© 2025 Focus Photo School · Rainmaker Platform